*.blog

by Justin Collins

Sanitizing, Escaping, and Encoding

“We need to sanitize this data” is a phrase I have heard too many times in the context of web security. It always makes me a little nervous.

The implication of the term “sanitize” is somehow cleaning the data or rendering it “safe”. But the details of how that safety is achieved are a little vague.

Often it means simply searching for a function containing sanitize and blindly using that function.

That is usually the wrong thing!

Injection Vulnerabilities

Injection vulnerabilities, including cross-site scripting, are a top category of web vulnerabilities.

The root cause of injection vulnerabilities is the mixing of code and data which is then handed to a parser (the browser, database driver, shell, etc). Injection is possible when the data is treated as code.

(See my talk about injection for a deeper dive!)

Since proper escaping or sanitization is the mitigation for injection vulnerabilities, it is important to have a clear understanding of what those terms mean.

Escaping

The term “escaping” originates from situations where text is being interpreted in some mode and we want to “escape” from that mode into a different mode.

For example, there are ANSI “escape codes” to tell your terminal to switch from a text mode to interpreting a sequence of control characters.

The more common situation is when a developer needs to tell a parser to not interpret a value as code. For example, when one is writing a string and wants to include a double-quote inside the string:

"blah\"blah"

The backslash \ is an escape character that tells the parser to treat the following character as just a value, not the end of the string literal.

However, especially in web security, when we say “escaping” we typically mean “encoding”:

Encoding

Encoding involves replacing special characters with a different representation.

HTML encoding uses HTML entities.

For example, < would normally be interpreted as the start of an HTML tag. To display a < character without it being interpreted as a tag, use &lt;.

In HTML, & is the escape character. So now you can see how encoding and escaping are intertwined.

In URLs, encoding involves replacing characters with % followed by a hexadecimal number that corresponds to the ASCII code for that character.

For example, / in a URL would normally be interpreted as a path separator. To pass in / without it being interpreted that way, use %2F.

This is called “URL encoding” or ”percent encoding” and the % character is the escape character. The value after % is the hex representation of the ASCII code for the desired display character.

Encoding special characters is typically a very simple and straightforward process. Characters are simply replaced with their encoded value in a linear fashion.

The encoding scheme used depends on context. For any type of interpretation (HTML, JavaScript, URLs, CSS, SQL, JSON, …) there will be a different encoding scheme. It is important to use the correct encoding for the context.

Also note that encoding is a completely reversible process! Given an encoded string, we can easily decode it back to the original value.

Sanitizing

Unlike encoding and escaping, sanitization involves removing characters entirely in order to make the value “safe”.

This is a complicated, error-prone process.

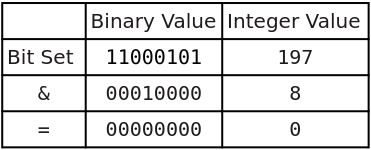
Here is a classic example of bad sanitization:

1
2
3
4
5
6
7
8
# Remove script tags!
def sanitize_js(input)
  input.gsub(/<\/?script>/, "")
end

sanitize_js("<script>alert(1)</script>") # => "alert(1)"

sanitize_js("<scri<script>pt>alert(1)</scr</script>ipt>") # => "<script>alert(1)</script>"

This is not just an amusing theoretical example - I have seen this exact approach used in production applications.

Since sanitization is so difficult - nearly impossible - to do correctly, most sanitization implementations have seen a number of bypasses.

Also, unlike encoding, sanitization is not reversible! Information is lost when the data is sanitized. You cannot retrieve the original input once it has gone through a sanitization process. This is rarely a desirable side-effect.

Sanitization can also mean removal or replacement of sensitive data. That is a different usage not being discussed here.

Using the Right Approach

From a security perspective, contextually encoding untrusted values at time of use is the preferred approach.

The tricky part is understanding the output context of the data and which encoding to use. HTML can easily have more than four different contexts in a single document! Also, it makes no sense to use HTML encoding in SQL.

When possible, use encoding routines provided by libraries or frameworks.

Sanitization should be reserved for cases when encoding is simply not possible. For example, if an application must accept and display HTML from users. There is no way to use encoding in that scenario.

Again, when possible, do not write your own sanitization! Use existing libraries.

Summary

When discussing handling potentially dangerous data, be precise with terms!

The security industry seems to have settled on “escaping” to actually mean “encoding”. In other words, a reversible transformation that encodes special characters so they will not be interpreted as code.

Sanitization, in this context, means an irreversible stripping of special characters.

When possible, prefer encoding/escaping to sanitization!

See Also

OWASP Cross-Site Scripting Prevention Cheatsheet

OWASP Injection Prevention Cheatsheet

Taking on the King: Killing Injection Vulnerabilities

Reviving an HP 660LX in 2019

It started off as a joke…

I had spent some time several years ago trying to get Linux running on this machine via the (defunct) JLime project, so I had some of the pieces available to actually get this little “pocket computer” going again - mainly compatible CompactFlash cards and an external card reader. But I was mostly joking.

Then I starting thinking how funny it would be to actually sit in a talk and take notes at DEF CON on an ancient “laptop”…

Battery Power

The reason I was mostly joking is because the batteries in the 660LX were not working at all. So, what was I going to do? Plug it into the wall? That’s just sad, not funny.

I started looking around online for replacement batteries for this machine from 1998. Despite visiting several rather shady websites, for some reason I was unable to find anyone selling twenty-year-old laptop batteries. Some sites claimed to offer a replacement, but from the pictures it was clear they would not work. The only real possibilities I found were complete sets - a 660LX, manual, cables, etc. I already had a 660LX, acquired for free, so I really didn’t want to spend $100+ on another one! Also, kind of ruins the joke to do so.

(Side note: the 660LX has a button battery for backup power. Searching for “HP 660LX battery” will return sites trying to sell you a little CR2032 battery.)

Now, I will admit my mental model of a laptop battery was a block of chemical goop inside of some plastic wrap with some wires coming out of it. After ungracefully disassembling the 660LX battery, I found inside it was just two smaller batteries?!

Open battery pack of HP 660LX

The batteries said “US18650S SONY ENERGYTEC” on them.

Sony 18650S Batteries

While I didn’t find those exact batteries, some investigation showed the 18650 battery in general is extremely common.

There are two kinds of 18650 - one with “caps” (that little nub on the top) and one without. It seems the ones with caps are safer, as they have an internal circuit to keep them from blowing up. However, as you can see above, I needed the kind without caps. Presumably the little circuit board regulates charging the batteries.

The Internet suggested sticking to “brand name” batteries, but weirdly Amazon does not carry any of those. I took a chance on a pack of batteries which reviewers suggested looked like “genuine” Samsung batteries.

Samsung 18650 batteries

I carefully ripped the old batteries out. The leads from the batteries to the little circuit board were actually soldered to the batteries, so I pried them off with a screwdriver. Probably not a great idea unless they are really, truly dead.

With some effort, I shoved the new batteries back in the case and sandwiched the wires back in as well. I didn’t bother actually attaching/gluing/soldering anything.

I did, however, scare myself when I generated a terrifying electric arc as I tried to use a screwdriver to squeeze everything back into the battery case.

HP 660LX batteries replaced

I may have damaged the case just a tiny bit when I gently pried it open, contributing to it looking slightly sketchy when I tried to close it back up.

HP 660LX battery put back together

But, who cares how it looks…does it work??

HP 660LX running on battery power

YES!

Hahahaha now I can walk around using my relic with no wires!

Software Updates

Nowadays, a device that can’t connect to anything does not seem like much fun.

Of course I wanted to hook this Windows CE 2.0 machine up to the Internet!

The HP 660LX has a “PC CARD” expansion slot where you can slap in an Ethernet or wireless card, but of course it is ancient and you have to be careful about compatibility.

Enter HPC: Factor! This is a website/forum full of useful information. For £10 you can get access to a ton of file downloads (software, drivers, updates) for a year. Totally worth it.

One thing I learned quickly is that you need the service pack for Windows CE 2.0 and the Network Service Pack in order to have a chance at getting a wireless card to work.

At this point, I had been transferring files to the 660LX via a compact flash card (which, at 8GB, probably blew the little machine’s mind). However, most software for Windows CE requires installation via ActiveSync.

Kingston CompactFlash card

What is ActiveSync? Well, originally these “pocket computers” weren’t meant to be tiny laptops. They were more like little helpers you use while you are away from your main machine, then you sync up files, calendars, email, etc. when you went back to your desk.

ActiveSync was the software used to sync between a pocket computer and your main machine.

Now, for Windows CE 2.0, the recommended version of ActiveSync is 3.8. The very newest operating system supported by ActiveSync 3.8 is Windows XP.

By pure luck, I had an old Windows XP laptop and I was able to install ActiveSync!

BUT… you need a special serial cable to hook up the 660LX. At first I poked around eBay, but no luck. Yet, in the back of my mind, I was pretty sure I still had that cable somewhere. I searched all around my office and dug through my big box of (mostly useless) cables, but still no luck.

Just when I gave up (of course) I found it!! Yay!!

BUT… turns out I don’t have a serial port on my Windows XP laptop.

I thought about trying a Windows XP virtual machine on my main Linux box, but it doesn’t have a serial port, either! None of my machines had an infrared port, either.

After first buying the wrong cable on Amazon, I got an RS-232 to USB adapter and a tiny, tiny CD with drivers. Luckily, the laptop has a CD drive, so I was able to actually install the proper drivers.

USB to serial cable

After an uncomfortable amount of configuration twiddling… they connected!!

ActiveSync is connected

I was then able to install Windows CE 2.0 SP1 and the CE Network Service Pack.

Installing Windows CE SP1

Networking

One of my criteria for this project was to not spend much money on a joke.

After spending some time looking around, I bought a $20 wireless adapter off of eBay. $20 was really right at the limit of my per-item budget.

In the meantime, though, I found out there was another way to access the Internet.

Turns out you can “share” the networking connection on the main machine with the 660LX over the serial cable, via ActiveSync.

The only weird bit is that you need to run a proxy server on the main machine to route the connection to the Internet.

In the modern world, that is not a problem. In the land of Windows XP, however, I was not sure I would be able to get something working. I found CCProxy, which did work, despite its awful and confusing interface.

Configured the proxy for “The Internet” on the 660LX and…

Accessing Google via Pocket Explorer

Wow! The Internet!

Sadly… or not so sadly… the world has moved to HTTPS and to stronger protocols than what lowly Pocket Explorer supports. Thus, most of the web is entirely inaccessible on the device.

Failure to access sites over HTTPS

As a result, when the eBay seller canceled my order for the wireless adapter, I figured “meh”. Even if you can get WiFi working (which would likely require connecting to a totally unsecured network), there’s not much of the web that one can even visit.

Yes, it would be possible to use an SSL stripper, etc., but I didn’t want to go through the hassle of setting that up on Windows XP.

Wrapping Up

The whole setup

This turned into more of a narrative than a how-to guide. Maybe I’ll do another write-up with the details. In the meantime, I can try to answer questions about specifics.

Finding Ruby Performance Hotspots via Allocation Stats

RubyParser is a library written by Ryan Davis for parsing Ruby code and producing an abstract syntax tree. It is used by Brakeman and several other static analysis gems.

Recently I was poking around to see if there was any low-hanging fruit for performance improvements. At first, I was interested in the generated parsers. Racc outputs some crazy arrays of state machine changes. Instead of generating arrays of integers, it outputs arrays of strings, then splits those strings into integers which it loads into the final array. I thought for sure skipping this and starting with the final array of integers would be faster, but…somehow it wasn’t.

I moved on to thinking about frozen string literals, which led me to checking String allocations.

Measuring String Allocations

I found the allocation_stats gem very useful for this.

I set up a test like this to read in a file and parse it:

1
2
3
4
5
6
7
8
9
10
11
12
require 'ruby_parser'
require 'allocation_stats'

f = File.read(ARGV[0])

rp = RubyParser.new

stats = AllocationStats.trace do
  rp.parse(f, ARGV[0], 40)
end

puts stats.allocations(alias_paths: true).where(class: String).group_by(:sourcefile, :sourceline).sort_by_count.to_text

This outputs a report like this (truncated here):

                    sourcefile                      sourceline  count
--------------------------------------------------  ----------  -----
<GEM:ruby_parser-3.11.0>/lib/ruby_parser.rb                 20  70686
<GEM:ruby_parser-3.11.0>/lib/ruby_parser_extras.rb        1361  58154
<GEM:ruby_parser-3.11.0>/lib/ruby_parser_extras.rb        1362  54672
<GEM:ruby_parser-3.11.0>/lib/ruby_lexer.rb                 373  19019
<GEM:ruby_parser-3.11.0>/lib/ruby_lexer.rb                 770  12005
<GEM:ruby_parser-3.11.0>/lib/ruby_lexer.rex.rb             109   8252
<GEM:ruby_parser-3.11.0>/lib/ruby_parser_extras.rb        1015   6818

Right away, these look like some juicy targets.

Version Creation

Let’s take a look at the first one:

1
2
3
4
5
6
7
8
9
10
11
class Parser < Racc::Parser
  include RubyParserStuff

  def self.inherited x
    RubyParser::VERSIONS << x
  end

  def self.version
    Parser > self and self.name[/(?:V|Ruby)(\d+)/, 1].to_i
  end
end

On line 8 you can see the Parser.version method. RubyParser is actually not just one parser, but multiple parsers for different versions of Ruby. So there is a RubyParser class but also Ruby18Parser, Ruby19Parser, etc. and RubyParser::V18, RubyParser::V19, etc. To figure out the version of the current class, the code above grabs the version from the class name itself.

The problem is this code is called a lot (70k+ in the example above) to make version-specific decisions during the lexing phase. This is fairly easy to fix.

In my testing, this reduced string allocations by ~25% and parse time by 5-10%. One thing I have noticed - and you may also find if you go chasing object allocations in Ruby programs - is that reducing allocations doesn’t necessarily help with peak memory use or run time. It seems the Ruby VM has gotten pretty good at allocating and garbage collecting objects efficiently.

Debug Code

Let’s take a look at the next two large number of String allocations:

                    sourcefile                      sourceline  count
--------------------------------------------------  ----------  -----
<GEM:ruby_parser-3.11.0>/lib/ruby_parser_extras.rb        1361  58154
<GEM:ruby_parser-3.11.0>/lib/ruby_parser_extras.rb        1362  54672

Interesting: just two lines apart, with over 100k allocations between them.

1
2
3
4
5
6
7
def push val
  @stack.push val
  c = caller.first
  c = caller[1] if c =~ /expr_result/
  warn "#{name}_stack(push): #{val} at line #{c.clean_caller}" if debug
  nil
end

The two lines of interest are 3 and 4 - the assignments to the local variable c, which pull information from caller. caller is a fairly expensive method, since it needs to generate a stack trace for the current method call.

Upon a closer look, it’s clear the c variable is only used in the message on the following line, and that message is only used if the debug flag is set. This means we can wrap all that code in a condition, like this:

1
2
3
4
5
6
7
8
9
10
11
def push val
  @stack.push val

  if debug
    c = caller.first
    c = caller[1] if c =~ /expr_result/
    warn "#{name}_stack(push): #{val} at line #{c.clean_caller}"
  end

  nil
end

This change saves 38-50% on string allocations and 20-26% on parse time.

Reading Lines

Skipping down a few unavoidable string allocations, there’s this one:

                    sourcefile                      sourceline  count
--------------------------------------------------  ----------  -----
<GEM:ruby_parser-3.11.0>/lib/ruby_parser_extras.rb        1015   6818

Here’s the code:

1
header = str.lines.first(2)

RubyParser checks the first couple lines of a file for any comments setting the encoding for the file. The trouble is that calling String#lines will split the entire string up when we only need the first two lines.

Grabbing only the first two lines ends up being pretty trivial thanks to Ruby’s standard approach of returning enumerators for enumeration methods if a block is not supplied:

1
header = str.each_line.first(2)

String#each_line will lazily return the lines from the string, so it only does the work needed.

Sadly, this didn’t do much for overall string allocations and parse time since this method is only called once, but I think it’s a clear improvement to only grab the two lines needed.

Freezing Strings

Finally, back to the original idea. By the time I made it back to freezing string literals, I was feeling pretty lazy, so I just threw the frozen string header on ruby_lexer.rb:

1
# frozen_string_literal: true

Running the tests showed only one method where frozen string literals did not work, so these strings needed to be duped.

String allocations were reduced by 24-30%, but with almost no parse time change. Probably because these were tiny, tiny strings.

Final Metrics

With these four changes, string allocations were reduced by 75-83% and parse time was reduced by 30-37%. The test suite for RubyParser ran 33% faster on my machine.

I did not see a huge decrease in peak memory use. Maybe 3%. My guess is this is because the String representation in Ruby is fairly well-optimized already (e.g. copy-on-write).

For Brakeman, parsing is a decent part of the run time (30-60% even), so a faster RubyParser definitely makes Brakeman scans faster. From a few test scans, I saw as much as a 30% improvement in total scan time.

Final Changes

The final version of the changes applied by Ryan are in this commit.

I expect these improvements will be in the next RubyParser and Brakeman releases.

Price Transparency With Brakeman Pro

Pricing in the static analysis security tool (SAST) world is difficult. Do you charge per project? Per repository? Per line of code? Per language? Per user? What defines a “user”? None of these approaches are very satisfying, because no single approach will cover all types of customers.

Instead, companies come up with per-customer pricing. Meaning they will look at a potential customer’s needs and size, and then come up with a number they think the customer might be willing to pay.

Then the negotation dance begins, where the customer attempts to talk the seller down 20-50% from the initial quote (which was kind of made up anyway).

To me, that’s stressful, time-consuming, and a little shady.

Personally, I do not want to deal with salespeople (and their relentless follow up emails/calls) just to get a rough idea of what a product will cost.

With Brakeman Pro, I wanted to be upfront and honest with customers. That’s why, as far as I know, we are the only commercial SAST with publicly-available pricing.

Want to purchase a license? You can buy with a credit card on the website and you never have to talk to anyone! That is the kind of interaction I like to have with a company - not “request a quote” or “contact us for pricing”.

Does that mean we make less money than if we had hidden price lists and made up numbers based on what we think a customer would pay? Almost certainly. Our customers range from companies making billions per year to individual users. It would be “smarter” to have the large companies pay more.

But the “mission” of the company is not to maximize profit. It is to fund development of a security product that will help make the world a little safer.

That is why it has been more important to me that we focus on number of customers, rather than overall revenue.

Challenges When Building Commercial Versions of Open Source

It has been roughly three years since the ball began rolling on Brakeman Pro (the commercial version of the Brakeman security tool for Ruby on Rails), and it has been a little over a year since Brakeman Pro actually went on sale. I have learned a ton in that time (and I am still having lessons beaten into me). There have been a ton of challenges going from an OSS project that was never meant to be a paid product to one people are actually buying. Here are just a couple I have much time thinking about:

The “Free” Version

Clearly, what makes building a commercial product on top of an OSS project different from just selling some software is the existing OSS project itself.

With an OSS project, there is an opportunity to acquire a large number of people testing the software in many different environments. For a static analysis tool like Brakeman, testing on a wide variety of codebases is incredibly valuable. OSS with easy bug reporting and contributing (e.g. a GitHub repo) is not only very likely to receive bug reports and patches, but also suggestions for features and improvements. Brakeman does not receive a large number of code contributions, but bug reports and suggestions for new rules have driven a large chunk of Brakeman’s development.

Being free and open source also makes it easier to advertise your project. People are more willing to promote free software and you can share it around social media with little fear of backlash. Not to mention it is vastly easier to give conference talks about open source tools!

Personally, I will forever be grateful to the OSS community. Being the main author of widely-used (within a small niche) software has propelled most of my career, led to me speaking all over the world, and has brought me acquaintances and friends I would not have otherwise. I am very glad Brakeman is open source and I would never want to change that.

However, the existence of a “free” version, especially a successful one, has a serious drawback for a business. In particular, the “paid” version must now not only justify its utility, but also the incremental advantage over the free version. It has become abundantly clear the biggest competitor to Brakeman Pro is Brakeman OSS!

The number one question I receive regarding Brakeman Pro is “What is the difference between Pro and the open source version?” Among other things, one very simple, easy-to-explain difference is the existence of a GUI. However, most people want to know if it will “find more things.” This leads to considerable hedging from me because Pro probably will find different vulnerabilities while also reducing some false positives - the net outcome of which may be more or fewer overall warnings. Explaining why Pro may report different vulnerabilities quickly gets me lost in fine details of how the two tools work - at which point people’s eyes tend to glaze over.

Trying to quantify the differences between the OSS and Pro versions is a losing battle for me. Potential customers try to add up all these little details and see if it comes out to enough of a difference to begin paying for software they are used to having for free. But, as a technical person, papering over the differences with hyperbolic qualitative statements can seem dishonest. I have yet to arrive at a good solution for this problem.

Existing User Base

With a well-established OSS project comes another big advantage: the existing user base. These users already like the project and have found it useful! In a way, they have validated a market exists for the product. In the case of Brakeman, I have also felt a tremendous amount of goodwill from the community (for which, again, I am incredibly thankful).

These users are going to be the very first people in line to try the commercial product.* They will already be familiar with the OSS version - therefore communicating and justifying the additional value of the commercial version will be critical. The good news is they already know what the product does and have found it valuable. In some cases (but not very many, I’ve found) they may even purchase the product just to support the OSS version. In most cases, though, people need to justify why they are spending budget on this particular software instead of using the free version.

If you are like me, you may also find this existing user base to be a source of stress. Marketing to OSS users often feels scummy, but it also makes no sense not to promote the commercial tool to the people already using the free version! For quite a while I did not want to take advantage of the existing audience at all. I have only made very small steps in that direction, preceded by a lot of thought. The last thing I want to do is alienate the community or burn any of the goodwill Brakeman has.

One way to push customers towards the commercial version is to make the OSS version obviously worse. But while it would make selling the commercial version easier, not working on or supporting the OSS version is unthinkable. Even the appearance of doing so could turn a community against you. When your potential customers are mostly developers the support of the developer community has extreme value. Besides the business aspect, I personally would have a hard time dealing with loss of the community when the community has done so much for me.

That leaves making the commercial version so much better than the OSS version the additional value is ridiculously obvious and people happily pay for it. Sadly (gladly?), many people have let me know “the free version of Brakeman is really good and already does all I need.” Making the Pro version extra awesome without hurting the OSS version is an ongoing struggle which I continue to hope will resolve itself over time as we continue to improve Pro.

Like many things, the existing user base for an OSS project has both advantages and disadvantages which need to be considered and kept in mind if one is going to turn the project into a commercial product.

As a Security Tool…

This probably does not apply to very many projects, but as a security tool Brakeman has additional issues related to those above. With every feature that might be exclusive to Pro, I must consider - “Am I making the world less safe by not adding this feature to the OSS version?” The answers to this question likely lead me to make terrible business decisions. In the end I can live without Brakeman Pro being a successful business, but consciously compromising my integrity and potentially the security of applications is not something I could personally handle.

As a result, the features that tend to go into Pro but not the OSS version are noisier, slower, or focused on ease of use and not actual vulnerability discovery. I believe more false positives (but potentially more true positives) are acceptable in the Pro version because we make it easy to triage and ignore them. Slower features are also much more acceptable in the Pro version - the OSS version needs to be fast and lean. (Sometimes these features also end up in OSS, just off by default. “Off by default” means they might as well not exist for most users.)

Conclusions

If you are considering taking an open source project and building a commercial tool on top of it, I hope this little post has given you some (perhaps less obvious?) issues to ponder. For Brakeman users, I hope this explains a little bit of the thinking I have done while trying to balance between OSS and Pro.

Note that this blog post is actually an example of the first two issues above: I had to tell you about the “free” version to talk about the Pro version and at the same time you probably feel like this is a bit of an advertisement for the Pro version!

(I think I have to plug my product here now? Brakeman Pro is a static analysis security tool for Ruby on Rails applications. Try it out for free.)


* One of the early mistakes I made with Brakeman Pro was not realizing who the first customers would be. I thought the people most willing to buy a tool would be security auditors, and so the tool and pricing were targeted at security professionals. Unfortunately, the much larger market and initial user base for Brakeman are developers. Brakeman Pro should have made developers our top priority from the beginning just like Brakeman OSS does.

Bundling Dependencies Inside Ruby Gems

Backstory

I recently decided to distribute the Brakeman gem with all its dependencies included. This was the culmination of a lot of frustration with Bundler, version conflicts, RubyGem bugs, and trying to maintain compatibility with older versions of Ruby while libraries did not.

Brakeman is most often used as an application, not a library. Yet most Rubyists are used to including all dependencies in a Gemfile for use with Bundler. Doing so causes Brakeman’s dependencies to be mixed in with users’ application dependencies, which doesn’t make sense and causes a lot of anguish.

I liken it to having to worry about whether or not your Rails application’s dependencies conflict with your browser’s. It shouldn’t matter.

However, Bundler does not have a way to isolate dependencies for applications like Brakeman, and Bundler is the best way to manage dependencies so we are stuck with it.

Since Brakeman is not normally loaded into users’ applications (and I recommend against doing so), its dependencies are separate and should not really matter to the end user. To this end, I wanted to distribute Brakeman with all its dependencies already inside the gem.

Bundling Dependencies

Conveniently, Bundler already has a way to do this: bundle install --standalone. This generates a bundle directory with two subdirectories bundler and ruby.

The bundler directory just has one file: setup.rb. This file adds the bundled gems to the load path. We’ll come back to this file later.

The ruby directory has everything you need to run Bundler, along with all of the bundled gems and their executables. The path to the gems looks something like ruby/2.3.0/gems/rake-10.1.1/. Note this includes the Ruby version and the gem’s version. When setup.rb sets up the library paths, it chooses dynamically based on the running Ruby implementation and version (which is not what we want, see below).

Adding Dependencies

All the dependencies are now there in the bundle/ directory, but it’s still assumed you will be using Bundler. I would prefer to just load the dependencies myself.

To do so, the Brakeman build script removes the bundle/bundler/setup.rb file and generates its own load.rb using similar logic. However, it does not build paths dependent on the running Ruby version because we don’t know what the end user will be using. Instead, it just globs the paths as they are and loads those.

In Brakeman itself, it loads bundle/load.rb lazily if the file exists. I do not use it in normal testing or development. In general, all that is needed is to require the load.rb file inside your code somewhere.

Building the Gem

All that is left to do is add the bundled gems to the Brakeman gem itself.

Note that Brakeman’s Gemfile relies on its gemspec, but the gemspec needs to rely on the bundled gems, leading to a circular dependency.

This simple code is all that is required in the gemspec:

if File.exist? 'bundle/load.rb'
  s.files += Dir['bundle/ruby/*/gems/**/*'] + ['bundle/load.rb']
else
  # add dependencies as normal
end

Pros

The main advantage of this approach is not polluting application dependencies! No more version conflicts! No more worries that weird Bundler or gem bugs will break users’ installs.

In theory it also makes it easier to distribute Brakeman as a standalone application, if someone were interested in that.

Cons

The main problem, of course, is that this hides the dependencies. If you add Brakeman as a dependency and then either load it programmatically or run it with Rake, you may get mysterious library conflicts. To avoid this, use the ”brakeman-lib” gem, which is the same as the main Brakeman gem but does not bundle dependencies.

It also locks dependencies to a specific version such that updating dependencies requires a new release. This can be good (avoid breaking with new versions) but it can also be bad if a library has a bug or vulnerability.

Code

The script I use to build the main Brakeman gem is here.

Here’s the annotated version:

#!/usr/bin/env ruby
puts 'Packaging Brakeman gem...'

# Clean up any existing build artifacts
system 'rm -rf bundle Gemfile.lock brakeman-*.gem' and

# Generate gem bundle in ./bundle
system 'BM_PACKAGE=true bundle install --standalone'

abort "No bundle installed" unless Dir.exist? 'bundle'

# Remove the setup.rb file we don't use
File.delete "bundle/bundler/setup.rb"
Dir.delete "bundle/bundler"

# Generate new file to set load paths
# Code below is a little confusing because it is generating code
File.open "bundle/load.rb", "w" do |f|

  # Set path at runtime
  f.puts "path = File.expand_path('../..', __FILE__)"

  # Add each gem's lib/ directory to the load path (again at runtime)
  Dir["bundle/ruby/**/lib"].each do |dir|
    f.puts %Q[$:.unshift "\#{path}/#{dir}"]
  end
end

# Build the gem
system "BM_PACKAGE=true gem build brakeman.gemspec"

When bundling gems and building the gem, the script sets the BM_PACKAGE variable so that development dependencies are not included in the bundled gems.

Automatically Lock Old Closed GitHub Issues

I am not sure this is a problem everyone has, but I grew tired of people commenting on old, resolved GitHub issues. Almost every time someone would comment “I have this problem, too” it would actually be a different issue. Then I’d go through the routine of asking them to open a new issue with details about their specific problem. Sometimes they would, and sometimes they’d never come back.

Fortunately, right around the time I decided I should do something about this annoyance, GitHub released an API to lock issues. (Locking issues or pull requests prevents any new comments except from repo collaborators.)

So I put together a little gem called github-auto-locker to fetch and lock old, closed issues.

To install it (requires Ruby):

gem install github-auto-locker

Then run:

github-auto-locker USER REPO TOKEN [age in days]

For example, I run this to lock resolved issues over 60 days old:

github-auto-locker presidentbeef brakeman N0TM1R34L70K3N 60

The default is 120 days.

I’ve been running it periodically myself since February without any complaints. Perhaps it will be useful to you!

Simple Readers-Writer Lock Gem

A readers-writer lock can be used to allow many concurrent read-only operations on a resource but ensure exclusive access for modifying operations performed by “writers”. For my purposes, I needed a readers-writer lock at the thread level, basically to control access to a shared array. In my scenario, the array is accessed through a server which may server many clients at once. Some requests will be to read elements from the array, while other requests might be adding elements to the array. There is no reason to restrict reads to one client at a time, but elements need to be added while no other client is reading or writing to the array.

My implementation is very simple (the entire RWLock class is 25 lines of code) because it relies on Ruby’s SizedQueue class. SizedQueue provides a thread-safe queue with a maximum size. If a thread attempts to add elements to a queue that is full, it will be blocked until an element is removed from the queue to make room. This is a key piece of funtionality used for the readers-writer lock implementation.

The RWLock class only really needs to provide two methods: one to provide read access, and one to provide write access. Since this is Ruby, the methods will take a block to execute the reading/writing code:

1
2
3
4
5
6
7
8
9
10
11
12
13
class RWLock
  def read_sync
    #lock magic
    yield
    #lock magic
  end

  def write_sync
    #lock magic
    yield
    #lock magic
  end
end

The internal state of the lock will be a SizedQueue and a Mutex.

1
2
3
4
  def initialize max_size = 10
    @write_lock = Mutex.new
    @q = SizedQueue.new(max_size)
  end

The SizedQueue will essentially be used as a counting semaphore. Each time a reader enters read_sync, the lock will push an element onto the queue. What the element actually is doesn’t matter, but I used true because it’s cheap. If the queue is full, the reader will block until a space has opened up.

1
2
3
4
5
6
  def read_sync
    @q.push true
    yield
  ensure
    @q.pop
  end

When a writer calls write_sync, it synchronizes on the mutex to prevent multiple concurrent writers. Then it adds n elements to the queue, where n is equal to the maximum size of the queue.

This has two effects: first, the writer is forced to wait for all current readers to finish. Second, it essentially prevents any new readers from gaining access (there is a small chance one will sneak in, but the writer will still have to wait for it).

1
2
3
4
5
6
7
8
9
10
11
  def write_sync
    @write_lock.synchronize do
      @q.max.times { @q.push true }

      begin
        yield
      ensure
        @q.clear
      end
    end
  end

Once the writer is finished, the queue is cleared, allowing all waiting readers to jump in. It is most likely waiting readers will get in before waiting writers, since the write mutex is held while the queue is emptied, but no effort is made to guarantee that one way or another. In practice, though, this seems to balance well between readers and writers.

One obvious downside of this overall approach is the SizedQueue limits the number of concurrent readers. A larger queue will cause writers to wait longer (assuming many readers) while a smaller queue may cause readers to wait on other readers. The upside is readers cannot monopolize the resource and cause writer starvation.

Unfortunately, SizedQueue#clear has been broken forever, since it was simply inherited from Queue and didn’t actually notify waiting threads that the queue is empty. For some reason, this does not appear to matter in Ruby 1.8, but in Ruby 1.9 and 2.0 it caused a deadlock.

This has been fixed in Ruby 1.9.3p545 and 2.1.1. For broken versions, the RWLock gem monkey-patches SizedQueue to fix the behavior. Unfortunately, Ruby 2.0 also had a bug in SizedQueue#push, so it is completely incompatible. The code does work under JRuby, but there are faster implementations using Java primitives.

RWLock is available as a gem and of course the code is on GitHub.

Testing Brakeman Against 253 Rails Apps

Here is some information about how Brakeman is tested!

Basic Testing and Continuous Integration

Brakeman does have a few unit tests…pitifully few. In fact, Brakeman had no tests at all until version 0.5.2, nearly a year after Brakeman’s initial public release. Unit testing Brakeman remains difficult, since much of the code relies on data built up from scanning an entire Rails application.

As such, the majority of tests in Brakeman rely on scanning sample applications and checking the resulting reports for an expected set of warnings. There are tests for the presence and absence of specific warnings, as well as checking for the specific number of warnings and an absence of reported errors. Since writing tests is pretty tedious, there is a script which generates the Ruby code to asserts the presence of reported warnings. This script takes the same arguments as Brakeman, so it’s simple to generate a set of tests for a specific scenario.

1
2
3
4
5
6
7
8
9
def test_information_disclosure_local_request_config
  assert_warning :type => :warning,
    :warning_code => 61,
    :fingerprint => "081f5d87a244b41d3cf1d5994cb792d2cec639cd70e4e306ffe1eb8abf0f32f7",
    :warning_type => "Information Disclosure",
    :message => /^Detailed\ exceptions\ are\ enabled\ in\ produ/,
    :confidence => 0,
    :relative_path => "config/environments/production.rb"
end

The tests run on Travis CI which is integrated with GitHub. This is especially helpful for testing compatibility with Ruby 1.8.7, which many Rails applications still run on and Brakeman will probably continue supporting for a long time.

Regression Testing with a Wide Net

Unfortunately, the sample applications Brakeman uses for tests are quite limited, not real, and generally just test very specific warnings or previous bugs. To gain higher confidence that Brakeman is not too broken, Brakeman is run against a set of 253 open source Rails applications I have managed to scrape together. (If you have an open source application to add to this test set, please let me know!)

The scans are run on my personal machine - six jobs in parallel, which takes about nine minutes total. After puttering around with a few different approaches, I ended up simply using the Queue class from Ruby’s standard library as the job queue. In a Frankenstein combination, a shell script starts up a JRuby process, which builds the Brakeman gem and then runs six threads for scan jobs. Each job launches Brakeman as an external process running under MRI 1.9.3 and, if successful, produces a JSON report. The JSON report is then augmented with some information about the Brakeman commit and the app that was scanned.

When all the apps have been scanned, the JSON reports are tarred up and sent to a server. I use DigitalOcean (referral link!) because I needed an Ubuntu setup and their API lets me use some handy scripts to spin the server up and down whenever I need it (and only pay for when it’s up).

On the server, the reports are unpacked and imported into a RethinkDB database. Since RethinkDB stores JSON documents, it’s simple to dump the JSON reports from Brakeman in there. I just have two tables: one just contains commit SHAs and their timestamps, and the other contains the actual reports. I have secondary indexes on the reports to efficiently look them up by the name of the Rails app or the Brakeman SHA.

A small Sinatra app serves up some basic graphs and allows two commits to be compared:

Brakeman Graphs

This “system” is not open source at the moment, but probably will be in the future when I’ve removed hard-coded stuff.

Anyhow, since I have all these reports, I can share some data…but just be forewarned you can’t really draw any conclusions from it!

Numbers!

This is the RethinkDB query for warnings per category, in JavaScript since I ran it in the web UI:

1
2
3
4
5
6
r.db("brakeman").
  table("reports").
  getAll("25a41dfcd9171695e731533c50de573c71c63deb", {index: "brakeman_sha"}).
  concatMap(function(rep) { return rep("brakeman_report")("warnings") }).
  groupBy("warning_type", r.count).
  orderBy(r.desc("reduction"))
Warning Category Count
Cross Site Scripting 6669
Mass Assignment 3385
SQL Injection 1353
Remote Code Execution 458
Denial of Service 440
Redirect 232
Format Validation 230
Attribute Restriction 205
File Access 200
Session Setting 169
Dynamic Render Path 140
Command Injection 116
Cross-Site Request Forgery 96
Default Routes 67
Response Splitting 44
Dangerous Eval 43
Dangerous Send 33
Nested Attributes 5
Information Disclosure 2
Authentication 2

Some educated guesses about these numbers:

  • Mass assignment numbers are likely high because they include warnings about dangerous attributes that are whitelisted.
  • Remote code injection is mostly uses of constantize and similar methods.
  • Most denial of service warnings are calls to to_sym on parameters
  • Response splitting is interesting because it is only reported in regards to CVE-2011-3186 which was fixed in Rails 2.3.13.

This last point made me curious about the Rails versions in use by the applications. Keeping in mind these apps are not necessarily up-to-date, they represent at least 37 different versions! Some were reported as unknown versions.

Here are the top ten:

Rails Version Count
3.2.13 26
2.3.5 19
3.0.3 18
3.2.14 14
4.0.0 11
3.2.12 9
2.3.8 8
3.2.11 8
3.0.0 7
3.1.0 6

With so many applications and nearly 14,000 warnings, there is a lot more information to go through here.

For now this process is used to help test new Brakeman code and avoid regressions. It’s stopped quite a few bugs from going out!

Fast Compact Sparse Bit Sets

Imagine you need a relatively compact data structure for quickly checking membership of mostly-consecutive non-negative integers. (If this sounds really specific, it is because it is precisely what I needed for a particular project.)

The Ruby standard library contains a Set class which may be a good starting point. Set is actually implemented as a Hash with the Set elements as keys and true as the values. Thus the overhead for storing a value in the Set is essentially only the value itself since all keys point to the same true object. Assuming a 64-bit machine, the overhead will be 64 bits per value. This seems reasonable, but given the specific limitations of the values we wish to store, perhaps we can do better?

Bit Sets

A bit set is a compact data structure of binary values where membership is indicated by setting a bit to 1. The position of the bit indicates the element value. For example, the second bit from the right might be used to indicate whether or not the value 1 is in the set.

One method to determine membership is to AND the bit set with a mask with only the desired bit set to 1. If the result is 0, the value is not in the set. If it is any other result (actually the mask itself, but the zero check is sufficinet), the value is a member of the set.

In Ruby, this looks like

1
bitset & (1 << num) != 0

For example, to check if the value 4 is in the set, we use the mask 00010000 (the 5th bit from the right is set to 1) which is the decimal value 8:

Bit Set Checking Example 1

Since the result is zero, we know the value 4 is not in the set.

If we check for the value 6, the result is not zero, indicating the value is a member of the set:

Bit Set Checking Example 2

Now, instead of 64 bits per value, it only requires a single bit! Now we just need to put a lot of bits together, either by using a long string or a bunch of integers in an array.

Sparse Bit Sets

The problem with a long binary string or an array of integers is that membership is entirely position-based. To store the value 1000, the data structure requires 1001 bits, all but one of which is set to 0. This is quite inefficient, especially for very large values.

One solution is to create a sparse bit set by combining a hash table with bit sets as values. The hash table keys provide fast look up of the correct bit set, then the bit set is checked for the desired element. The keys indicate the lowest value stored in the bit set (e.g., the decimal key 4 pointing to the binary bit set 00000001 would mean the value 4 is in the set).

Below is an example of a hash table using integer keys and 8 bit integers for the bit sets:

Sparse Bit Set Example

The average overhead is ⌊(m * n) / w⌋ + m bits, where m is the number of values (assumed to be consecutive), w is the number of bits per bit set, and n is the number of bits per key. In 64-bit Ruby, if we use integers for the bit sets, n = 64 and w = 62*. This works out to an average of 2 bits per value in the set. Of course, a single value incurs the overhead of both the key and the bit set: 128 bits! But if there are many consecutive values, the cost per value begins to shrink. For example, the numbers 0 to 61 can be stored in a single bit set, so 62 values can be stored in the 128 bits and we are back to about 2 bits per value.

Note that while it is best to use consecutive values which fit neatly into the bit sets (in this case, runs of 62 integers), the sequences can start and end at arbitrary points with only a little “wasted” overhead. To store just the number 1000, we now only need 128 bits, not 1001.

On top of the space savings, the membership checks remain fast. Still assuming 64-bit Ruby, to determine if a value is in the table look up index i = value / 61. Then check the bit set with bitset & (1 << (value % 61) != 0 as previously. (The divisor is 61 because there are 62 bits, but the values are 0 to 61).

Space Efficiency

I have implemented a Ruby version of the data structure described above which I call the Dumb Numb Set (DNS).

To measure the space used by the bit sets, we compare the Marshal data size for the bit sets versus regular Hashes (using true for all values, just like a Ruby Set).

These are the results for perfectly ordered data on a 64-bit version of Ruby 1.9.3 (size is number of bytes):

1
2
3
4
5
6
7
8
9
10
11
12
Items        Hash         DNS      %reduction
---------------------------------------------
   1   |           7  |        41   |-486%
 100   |         307  |        61   |  80%
  1k   |        4632  |       253   |  95%
 10k   |       49632  |      2211   |  96%
100k   |      534098  |     24254   |  95%
  1M   |     5934098  |    245565   |  96%
 10M   |    59934098  |   2557080   |  96%
100M   |   683156884  |  26163639   |  96%
  1B   |         ?    | 262229211   |   ?
---------------------------------------------

At 1 billion items, my machine ran out of memory.

For a single item, as expected, overhead in the DNS is quite high. But for as little as 100 items in the set, the DNS is considerably more compact.

This is, however, the best case scenario for the DNS. Less perfectly dense values cause it to be less efficient. For very sparse values, a Hash/Set is probably a better choice.

Even Better Space Efficiency

It may not surprise you to find out I was very interested in minimizing the serialized version of the sparse bit set for sending it over a network. In investigating easy but compact ways of doing so, I realized the Marshal data for Hashes and integers is not very compact, especially for large integers.

Fortunately, there is an existing solution for this scenario called MessagePack. For storing 1 million values, serialized size is reduced from 245,565 to 196,378 bytes (20%). The DNS will use MessagePack automatically if it is installed.

Performance

Somewhat surprisingly, the DNS is quite fast even when compared to MRI Ruby’s Hash implementation.

With MRI Ruby 1.9.3p448 (x86_64) and 1 million values:

1
2
3
4
5
6
7
8
9
10
11
                           user     system      total        real
Hash add random            0.540000   0.020000   0.560000 (  0.549499)
DumbNumbSet add random     0.850000   0.020000   0.870000 (  0.864700)
Hash add in order          0.540000   0.020000   0.560000 (  0.556441)
DumbNumbSet add in order   0.490000   0.000000   0.490000 (  0.483713)
Hash add shuffled          0.570000   0.020000   0.590000 (  0.589316)
DumbNumbSet add shuffled   0.540000   0.010000   0.550000 (  0.538420)
Hash look up               0.930000   0.010000   0.940000 (  0.940849)
DNS look up                0.820000   0.000000   0.820000 (  0.818728)
Hash remove                0.980000   0.030000   1.010000 (  0.999362)
DNS remove                 0.950000   0.000000   0.950000 (  0.953170)

The only operation slower than a regular Hash is inserting many random values. All other operations are roughly equal.

Conclusion

For my specific scenario, a simple custom data structure was just as fast as a built-in data structure, but required significantly less space for the expected use case.

There are other solutions for this type of problem, but it should be noted I only really care about fast insertion, fast membership checks, and compact representation. Additionally, values may be very large, although I attempt to keep them within the Fixnum range for Ruby (i.e. less than 262 - 1). This rules out some implementations which require arrays the size of the maximum value!

I also did not want to deal with compression schemes, of which there are quite a few, since my sets were going to be dynamic. I imagine there are very efficient implementations for fixed data sets.

Footnote: Integer Size in Ruby

Integers in 32-bit MRI Ruby only have 30 bits available, and in 64-bit MRI Ruby they only have 62 bits available:

1
2
3
4
5
$ irb
1.9.3p448 :001 > ("1" * 62).to_i(2).class
 => Fixnum
1.9.3p448 :002 > ("1" * 63).to_i(2).class
 => Bignum